One of the most frequent questions we are asked is the best way to create cleavage when using breast forms to enable the dresser to wear lower-cut dresses and tops. There are a number of products on the market to help and some work to varying degrees depending on the size and the shape of the persons existing chest and the type of forms being used. Most of these items like the Busty Cleavage Creator or the QBRA work on the same principal which is to draw the existing breast flesh together and hold in place to form cleavage and they work very well on their own. However, some are less successful when it then comes to building the next layer and adding the breast forms if your objective is to have the true feminine shape of a well-proportioned bosom together with realistic cleavage.
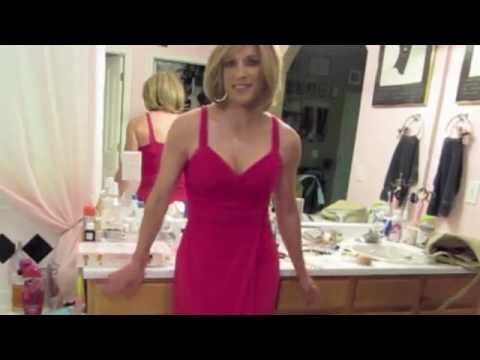
Look at the picture on the right of the attractive cleavage and very feminine shape. You could be forgiven for thinking it was a picture of a genetic girl but you would be incorrect in that assertion. It’s one of our very favorite New Jersey girls, Nicole, and she is one of the most successful creators of cleavage we see. So what is the miracle product that Nicole uses to create such a realistic cleavage and where can you get it? Surely, if it’s a miracle product then it must be very expensive isn’t it? The main product can be bought in any high street and costs $4 or less. So, what is it?
The following body of the article is published by kind permission of Nicole and takes you through the stages, step-by-step from bare chest to the end picture with a full bosom and very pleasing cleavage. As with most techniques a little time, careful preparation and attention to detail will ensure best results here but it is a simple technique.
How to create a realistic cleavage using tape
Creating realistic cleavage isn’t all that difficult. In fact, it only requires a couple of simple items and a little practice. To begin, you will need some tape, alcohol and a product to remove any residual adhesive from the tape you use.
It is always best to begin with a cleanly shaven chest. This is important for three reasons, first, tape will adhere better to hairless skin, second, it will be less painful when removing the tape and third, well you just look much more feminine without a hairy chest.
![]()


So to begin, ensure that your chest is free of hair. Apply an alcohol wipe to the area of skin below your nipples and downward about 4 – 6 inches and from the center of your chest over each breast and towards your arms. Allow the alcohol to air dry completely before proceeding to the next step, this is very important to achieve the best results.
You can use either 3M Transpore tape (or Blenderm 1 inch tape) or plain old fashion duct tape. Both will perform the same function, but duct tape will hold better, last longer and is less prone to tear. A word of warning though; the manufacturers of duct tape (or GB Services/GlamourBoutique.com) do not recommend covering bare skin with the product and you should take care to test your skin first in a small area to see if you have any allergic reaction. The Transpore tape should be the one inch wide version and the duct tape can be any color you choose.
Measure the distance from the outer side of your left breast to the outer side of your right breast. This measurement is a good starting point for the length of the pieces of tape you will be working with. If you are using Transpore tape, cut two pieces to this length. If you are using duct tape, cut one piece to this length and then cut it lengthwise down the middle of the strip to create two equal pieces. For this demonstration, I will be using duct tape.
![]()

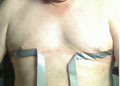
Apply one piece of tape to your left breast starting about 4-6 inches to the left of your nipple; let the right end of the tape hang down for the moment. Take the second piece of tape and repeat this step for your right breast. At this point you should look like the picture below.
![]()

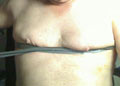
Now, take the two loose ends of tape and pull them across each other. This will result in pulling your breasts together and creating the actual illusion of cleavage. Pull the tape as far as you can and place it over the previously attached tape. In other words, when you are finished, the right end of the tape on your left breast will be covering the tape on your left breast and the left end of the tape on your right breast will be covering the tape on your right breast. See the next 3 photos for these steps.
![]()

![]()
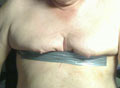
Use your hands to adjust the line created by pulling your breasts together to create the most realistic looking cleavage. Now, cut another piece of tape the same length as the first and place this tape over the previously applied tape. Start at either side of your chest and adhere the tape firmly to the already applied tape.
![]()


Pull the free end of this piece of tape across your chest while at the same time further forcing your breasts together. You have now created your cleavage and if done properly you look very realistic.
![]()
At this point you have several options for completing your cleavage. One that can add another level of realism is to apply dark colored powder to the crevice to make it appear deeper and you can apply light colored powder to the breast to make it stand out more. This takes a lot of practice to get it right and if not done properly can really look bad. Be careful if attempting this coloring.
Finally, put on your bra.
![]()
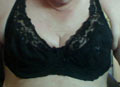

Insert your breast forms to complete the transformation.
![]()
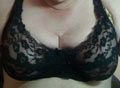
And the final results are truly astonishing. Remember to wear the right top and accessorize to highlight your new feminine bust and cleavage area.
![]()

One final point, when removing the tape, start at either end and pull GENTLY, very GENTLY. If you do this too fast it is possible to remove skin – you have been warned. Once the tape is removed use a product like Walker Adhesive Remover, Goo Gone or De Solv-it to remove any adhesive residue left by the tape.
As a word of caution GlamourBoutique.com would recommend when starting out you use the medical tape first as this can be gentler on the skin especially at removal time.